Friday, March 30, 2012

Reading Report

This week my kindergartner did all of our aloud reading. She read five books total and she is incredibly proud of herself. She is especially competitive, so I think that she is pleased to have accomplished something that the others can do.

This week I completed only one book, but it was something that I had wanted to read for months. Last fall, I read The Paris Wife; a novel about Ernest Hemingway, his first wife and their time in Paris. It intrigued me enough to pick up A Moveable Feast written by Hemingway (published after his death) about this same time in Paris. After reading these two books, and learning that F. Scott Fitzgerald and Ernest Hemingway were friends, I decided that the logical conclusion should be to read The Great Gatsby.

The Great Gatsby written by F. Scott Fitzberald

This is a simple tale about life in the 1920’s and the rise and fall of the American dream. Love, lust, wealth, scandal, and mystery all play a part. Jay Gatsby embodies the American dream; but his rise to wealth and status does not bring him the love of his life. His story is told by a neighbor, Nick who is also looking for love and happiness. Both are searching for something that they never quite grasp; and, it all ends in tragedy.  

What I liked about this book is that it left me wanting more. So many authors try to wrap up every last detail and tie it with a pretty bow at the end. Not so in The Great Gatsby. I think that as I finished the book I found myself with more questions than answers and I am pleased with that. I can understand why so many students are required to read this in school. There are numerous topics that would be perfect for further examination and discussion. I would certainly recommend this to anyone who loves 20th century classic literature, or to a student needing material for a book report/discussion paper.

To learn more about this weekly reading report, click on the Reading Report tab above.

Thursday, March 29, 2012

Pigs in a Blanket


I found a new way to use my Artisan Bread Dough; Pigs in a Blanket.  My husband was working a 24 hour shift the other night, so I thought it was the perfect opportunity to have kid food for dinner. They were so simple to make, and the kids enjoyed helping. We dipped our hot dogs in ketchup, mustard, and BBQ Sauce.  Then, I packed the leftovers in the kid’s lunch boxes for the next day.  When I told my husband about them, he was disappointed that he wasn’t here to try them. I’m sure I will be making them again soon for him!

Pigs in a Blanket

1 lb. artisan bread dough (I use half white whole wheat flour and half all purpose flour)
8 hot dogs
1 Tbsp. melted butter

Divide dough into 8 pieces. Using your hands, flatten each piece of dough into a circle about 2/3 as big as the hot dog. Wrap the hot dogs with the dough, overlapping the dough and pinching it to close. Place hot dogs, seam side down, on a cookie sheet and let rise for 30 minutes. Bake at 400˚ for 20 minutes. Remove from oven and brush with melted butter. Serve immediately.

Note: You can find the Master Recipe for this Artisan Bread Dough in Five Minutes a Day, along with an instructional video, here.

This post has been linked to Try New Adventures Thursday.

Wednesday, March 28, 2012

Fruit Juice Jelly


I have an unnatural obsession with jellies, jams, and spreads. At one time, my husband opened our refrigerator and counted 27 jars of opened jellies, etc. Enough said. As a result, for the last year, I have been on a jelly freeze. We move a lot, and each time we move, the fridge has to be cleaned out and all opened jelly jars, must be disposed of. So, knowing that I would only live here in TX for one year, I put myself on this self imposed jelly freeze.  It has not been easy for me. But, with only 10 weeks until our move out date, I only have 3 open jars and 2 unopened jars in the house. In my mind, this is complete success.

To reward my own efforts, I made Fruit Juice Jelly with some mixed berry juice that I found on sale this week. I had a couple of boxes of pectin in the pantry that I wanted to use up, so this was an easy way to do so. In the past, I have made this jelly with 100% cranberry juice, an orange pineapple blend, and a strawberry blend. All have turned out great. This is an inexpensive way to begin canning and it takes very little time.

Fruit Juice Jelly

4 cups unsweetened juice
¼ cup lemon juice
1 pkg. (1.75 oz.) powdered fruit pectin
4 ½ cups sugar

Pour fruit juice and lemon juice into a large pot. Sprinkle with the pectin. Bring to a full and rolling boil over medium high heat, stirring frequently. Stir in sugar. Return to a full and rolling boil, stirring often. Boil for 3-5 minutes, stirring constantly. Remove from heat and skim off foam with a spoon. Fill jars and process according to manufacturer’s directions. Yield: 3 pints.

This post has been linked to the Penny Pinching Party.

Tuesday, March 27, 2012

Pumpkin Pie Spice


Have you ever started putting a recipe together only to find out that you are missing an ingredient? It is so frustrating! Well, Pumpkin Pie Spice is one of those ingredients that I have found myself without. But, You Can Make That! This is a great substitution that keeps you from having to run out to the store at the last minute; thus, saving you time and money. I like to double the recipe because I use it frequently in my Applesauce Breakfast Cake.

Pumpkin Pie Spice

1 Tbsp. cinnamon
1 tsp. nutmeg
1 tsp. ginger
½ tsp. cloves

Measure all ingredients into a small glass jar. Shake to combine. Use just like store bought pumpkin pie spice.

Frugal Tip: Store your homemade Pumpkin Pie Spice in an old jelly jar or in an old cinnamon container. And, be sure to label it with the contents.

This post has been linked to Frugal Tuesday Tip.


Monday, March 26, 2012

Oatmeal Raisin Muffins


This week a friend asked me if I created a weekly meal plan. Yes, I do plan out our meals: breakfast, lunch, and dinner. But, not in a rigid, put a chart on the fridge type of way. In general we eat muffins, biscuits, oatmeal, and some type of breakfast cake for breakfast each week. But, I do not plan out which days we will eat what. For lunch, the only thing that I plan out is a homemade snack to pack in the lunch boxes, like Granola Bars, Nut Free Trail Mix, etc. For dinner, I make a list of meals and then prepare them in no particular order. In the past, I have planned out an entire month of meals at a time. I no longer feel the need to be so organized. So, a weekly meal plan works perfectly for us.

These Oatmeal Raisin Muffins have been on our breakfast table a lot lately. But, you will definitely need to plan ahead to make them because the oats need to be soaked overnight. They are super moist, healthy, and filling. And, if you have leftovers, they pack nicely for lunch. If you do not care for raisins, you can substitute just about any dried fruit, nuts, or berries. They are pretty tasty with orange zest too.

Oatmeal Raisin Muffins

1 cup milk
1 cup old fashioned oats
1 cup white whole wheat flour
1 tsp. baking powder
½ tsp. baking soda
½ cup raw sugar
½ cup unsweetened applesauce
1 egg
2/3 cup raisins
1 tsp. cinnamon

Measure the milk and oats into a large bowl. Cover and refrigerate overnight. In the morning, add remaining ingredients and stir until combined. Scoop into greased muffin pan and bake at 375˚ for 15-20 minutes, or until golden. Cool five minutes, then carefully remove from pan. Serve immediately. Yield: 12 muffins

Friday, March 23, 2012

Reading Report

I am feeling a huge sense of accomplishment this week because we finally finished reading Five Little Peppers. We have been working on it for several weeks, and we all enjoyed it. I normally read a chapter book out loud to my kids every day after school for my kindergartener’s homework. However, her reading skills are improving, so I am going to be doing less reading in order for her to do the reading herself. Yesterday, she read Green Eggs and Ham to us all by herself without any help. This is the first time she had picked up that book, so there is no way that she had memorized it. We were all pleasantly surprised by her ability.
Five Little Peppers and How They Grew
Written by Margaret Sidney

This is an old fashioned story about a family struggling to survive. The five children, the Peppers, range is ages from 11 to 4; and, they all must do their part to make ends meet. As a result, some of the children are working to earn money for the family and none of them are able to attend school. Their life is simple, but full of love and happiness.

This classic story is sweet and sad at the same time. My children were alarmed to hear that these kids had never had a birthday cake or received a Christmas gift, but were happy just the same. And although the writing style is a bit different than that of current authors, with long sentence and little punctuation, it still made a great read aloud. However, it may be a bit difficult for a young child to read on their own. I would certainly recommend it to anyone with lower elementary school children. It caused a lot of discussion within our family about poverty and simple pleasures.

Freakonomics: A Rogue Economist Explores the Hidden Side of Everything written by Steven D. Levitt and Stephen J. Dubner

This is one of those books that may not appeal to everyone. It discusses troubling questions of everyday life and then uses cold hard data and statistics to discover the answers. Questions such as: “Why do drug dealers live with their moms?” and “What makes the perfect parent?”.  And, the answers are surprising and sobering. I thoroughly enjoyed this book. It was easy to read and included a good bit of humor. And, best of all, it caused me think about the cultural concerns discussed in a new light.

If you are interested in learning more about this weekly reading report, click here. Or, to see a list of completed books, click on the Reading Report tab above. 

Thursday, March 22, 2012

Something for Nothing


I had a super busy day yesterday. I got together with some lovely ladies in the morning, visited with a good friend in the afternoon, and then finished my day with homework and dinner with the family. We ate roasted chicken last night and I really wanted to use the carcass to make broth, but I just didn’t have the energy to tend to a simmering pot for several hours. However, I vaguely remembered reading somewhere that I could make broth in my slow cooker overnight. So, I did, and it turned out perfectly!

Slow Cooker Chicken Broth

1 chicken carcass, bones, and skin
Water

Place chicken carcass in the slow cooker. Add enough water to completely cover the bones. Cover with the lid and cook on low overnight. In the morning, strain the broth to remove the bones and ladle into canning jars. Store the broth in the refrigerator. After it is chilled, the fat will rise to the top and can be removed with a spoon. Use your homemade broth just as you would use purchased broth. Yield: Varies. This time I ended up with 12 cups broth.

Frugal Tip: Making your own chicken broth is practically free! One 12 cup batch saves me $6.81 over store bought broth.  

This post has been linked to Try New Adventures Thursday.

Wednesday, March 21, 2012

Today I Am...

… looking forward to getting together with friends and munching on this yummy Hot Corn Dip.


… thinking that my kids would love for me to make this Peeps Cake for them using my homemade Black Magic Cake recipe.


… hoping to test this recipe for Ranch Mashed Potatoes.


What recipes are on your mind today?

Tuesday, March 20, 2012

Orange Oil

At Christmas time, I told you about a recipe for White Chocolate Orange Crunch. When I initially purchased the ingredients, I bought the wrong thing. I got orange oil instead of orange extract. Not knowing the difference between the two, I went back to the grocery store and purchased the orange extract.


However, now that our cross country moving is rapidly approaching, I knew that I had to find a use for that orange oil, or it would end up going to waste. So, this weekend, I made Cinnamon Syrup. And, I added ½ a teaspoon to the syrup with the other ingredients and it turned out GREAT! It is so much stronger than the orange extract and the flavor is more natural.


I think that I have fallen in love with orange oil. I plan to try it in Overnight Oatmeal and chocolate cupcakes later this week. If you have any other recipe ideas, I would love to hear about them. 


Frugal Tip: Be intentional about using up what you have in your pantry and fridge instead of letting food go to waste. Make plans to eat up leftovers, nearly expired food, or wrongly purchased ingredients.

This post has been linked to Frugal Tuesday Tip.

Monday, March 19, 2012

Chocolate Waffles


I am enjoying the quiet in my house this morning. It has been awfully loud and messy at our house over Spring break. So, today I am going to revel in my solitude and do a little damage control.  Number one on my list is to make some ChewyGranola Bars for our afterschool snack. Then, I will move on to housekeeping. I wish that I had an audio book to listen to while I work, but all I have is a kid’s book. Maybe I will listen to it anyway.

During Spring break, I made a couple out of the ordinary breakfasts for the kids. We tend to eat waffles only if we have the time to sit and savor them. But, the batter for these Chocolate Waffles can be made the night before and cooked in the morning; so, there really is no reason not eat them during the week. If you do not have a waffle maker, you can use the batter to make pancakes instead. I ate my chocolate waffles with Triple Berry FruitSpread; my older two ate them with Cinnamon Syrup, and my little one ate them with Chocolate Syrup.  These are also good as a dessert, topped with ice cream.
  
Chocolate Waffles

½ cup butter (1 stick)
4 eggs
1 tsp. vanilla
1 cup water
1 cup raw sugar
½ cup cocoa
2 cups white whole wheat flour
1 tsp. salt

In a large bowl, melt butter in the microwave. Whisk in eggs, vanilla, water and sugar. Stir in cocoa, flour and salt. Follow the directions on your waffle maker to cook waffles. Yield: 4 large Belgian waffles.

This post has been linked to Mop It Up Mondays.

Friday, March 16, 2012

Reading Report

We are on spring break this week and have spent our time playing outside, eating ice cream, and visiting with friends. Today we plan to go to a nature park along the river. I see muddy feet and soaking wet clothes in our future. Our house has been loud and messy; we have stayed up late and slept in. And, we have watched lots of DVDs. It has been a true break for us.

As a result of all of this, I have spent very little time reading. However, I have finally finished the third book in the Lark Rise to Candleford Trilogy. I read the first book last fall and the second book earlier this year. My parents recommended it because they enjoyed the TV series on PBS so much that they both read the book.
 
Lark Rise to Candleford: A Trilogy written by Flora Thompson

This trilogy is semi-autobiographical and is a tribute to rural life in England during the late 1800’s. Laura (Flora Thompson’s character) is a young girl who grew up in a small hamlet called Lark Rise. As the oldest of six, Laura learned to keep house and care for the younger children. Life in the hamlet was simple; the people lived off of the land, worked hard, and made do with what little they had. By the time Laura was 14, her education was complete and she was sent away to work as a post office clerk, eight miles away in Candleford Green. The “old ways” were instilled in Laura/Flora as a young child and the value that she placed on those long forgotten ways is evidenced by her writing of this book.

To learn more about this weekly reading report, click here.

Thursday, March 15, 2012

BBQ Rub


I have been trying to find the perfect BBQ Rub for a couple of years now. This is my most recent attempt. I made it to use on the pulled pork we ate earlier this week. We liked it, but I did not use enough and it needed a bit more spice. Last night, I reheated the leftover pulled pork and added some more of the rub. Better, but not perfect. However, it is a great improvement over the last recipe that I tried which was too salty and had no spice at all. Next time, I think that I will add more cayenne and possibly some dried onion. If you have a fabulous BBQ Rub recipe that you are willing to share, I would love to test it out!

BBQ Rub

2 Tbsp. paprika
2 ¼ tsp. cayenne pepper
1 Tbsp. plus ¾ tsp. black pepper
1 ½ Tbsp. garlic powder
2 ¼ tsp. onion powder
1 ½ Tbsp. salt
1 ¾ tsp. oregano
1 ¾ tsp. thyme

Measure all ingredients into a small jar and shake to combine. Use as a seasoning on chicken, pork, or beef. 

Frugal Tip: Be sure to save your old jam jars. They are perfect for storing seasoning mixes. 

This post has been linked to Try New Adventures Thursday.

Wednesday, March 14, 2012

Roasted Chickpeas


My family has fallen in love with this crunchy little snack (well, 4 out of 5 of us anyway). If you have never heard of this before, you may be a little skeptical, but trust me, these things are addictive! I use the dried chickpeas and cook them in the slow cooker before roasting them. But, if you want to eliminate that step, you can use canned beans instead.

Roasted Chickpeas

2 -16oz. cans chickpeas or ½ pound dried chickpeas, cooked and cooled
1 Tbsp. olive oil
Cajun seasoning to taste
Salt to taste

Rinse and drain chickpeas. Pour out onto a dry dish towel to soak up any additional water. Remove the skins that have separated from the chickpeas and discard. Put the chickpeas onto a 10x15 cookie sheet. Drizzle with olive oil and, using your hands, toss to coat. Bake at 400˚ for 35-45 minutes, or until golden and crispy. Sprinkle with Cajun seasoning and salt. Eat warm or cooled.

Frugal Tip: Use dried chickpeas instead of the canned for these Roasted Chickpeas, it is definitely cheaper. A one pound bag of dried chickpeas costs $.84 at my grocery store. The canned equivalent costs $3.36.  


This post has been linked to The Thrifty Home Penny Pinching Party.

Tuesday, March 13, 2012

BBQ Sauce


I made pulled pork for dinner last night. But, I had a colossal oversight. No BBQ sauce. So, I dusted off this long forgotten recipe and stirred it up for our sandwiches. This used to be the only BBQ sauce we ever ate, so I’m not sure why I stopped making it. (Maybe it is because I have three unruly children who sometimes make me crazy at dinner time!) 

It is a good feeling to have been able to solve the no BBQ sauce dilemma with a homemade solution. It saved me a trip to the store and a dollar or two. And, the best part is that I used up the last of the molasses. And, with our upcoming cross country move, this is a good thing.

BBQ Sauce

½ cup ketchup
2 Tbsp. Worcestershire sauce
2 Tbsp. white vinegar
2 Tbsp. molasses

In a small bowl, stir together all four ingredients. Use immediately, or store in the refrigerator for up to 2-4 weeks.

Frugal Tip: This BBQ Sauce recipe is a simple and inexpensive alternative to store bought sauce.

This post has been linked to Frugal Tuesday Tip and Tasty Tuesday.

Monday, March 12, 2012

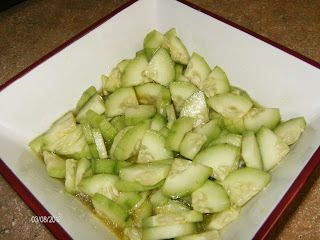
Cucumber Salad


This is a simple, frugal recipe that always pleases my family. I tend to make this when I have no energy or inspiration for anything else. It is so quick to make and I can throw it together in just a couple of minutes. Then, I refrigerate it while the rest of our meal is cooking. In the summer, when tomatoes are fresh, I like to cut them in medium sized chunks and add them to this Cucumber Salad.

Cucumber Salad

2 large cucumbers
¼ cup white wine vinegar
2 Tbsp. olive oil
2 Tbsp. raw sugar
Salt to Taste

Peel cucumbers. Cut in half length wise and then cut each half length wise again. Thinly slice each length of cucumber. Put into a large bowl.  For the dressing, combine the white wine vinegar, olive oil, and raw sugar in a small bowl. Whisk together and pour over the cucumbers, stirring to coat. Add salt to taste. Refrigerate for 30 minutes before serving.

Friday, March 9, 2012

Reading Report

Not a lot of reading has happened around here lately. I’ve had a nasty sore throat and have fallen into bed much earlier than usual every night for almost a week. I have continued to read to my kids every day after school, but not for very long because of the sore throat. We are reading an especially long book that we have been working on for three weeks. Hopefully, we will finish it next week some time, but I can’t promise that. The one book that I have to tell you about is exceptional though, so maybe quality will make up for the lack of quantity.

Living into Focus: Choosing What Matters in an Age of Distractions written by Arthur Boers

Most people live busy and hectic lives, running from one commitment to the next longing for more time, energy, and personal connection. This type of living has become the norm in our culture. However, Arthur Boers describes a different type of lifestyle that allows people to focus more effort into what really matters most. This focused living is an effort to slow down thus reducing stress and allowing for more time for our family, friends, faith, and hobbies.

This book describes the type of lifestyle that our family has slowly gravitated toward over the last few years. I can testify that the reduction of our activities, screen time, social media, consumerism, and waste has granted us more time for our family, health, entertaining, ministry, and hobbies. And, we are happier for it. This book is the perfect follow up to the book 7: An Experimental Mutiny Against Excess that I read a couple of weeks ago.

To learn more about this weekly reading report, click here. Or, to see a list of books already completed this year, click on the Reading Report tab above.

Thursday, March 8, 2012

Dried Fruit


This week I visited with my friend Terri and her sister-in-law, Kathy. The purpose of our visit was for Terri to show us how she dries fresh fruits, veggies, and herbs for later use. I have made Apple Chips before and have been very pleased with the results, so I thought that this would be a great chance to learn more about drying other foods.

To start out our day together, Terri showed off some of her previous efforts. Pictured above are dried bananas, apples, mangos, and oranges. We taste tested all of these along with some dried blueberries. She also showed us some onions, green peppers, and basil that she had previously dried. Terri uses an inexpensive food dehydrator to dry her fresh produce and she shared with us lots of information on the different types of dehydrators available. There are pros and cons to each type and Terri has done her research. And, she gladly answered all of our questions. I really enjoyed our time together learning about something new. Thank you Terri for being such a patient teacher!

I haven’t decided yet if I am going to start scouring the thrift stores for the perfect food dehydrator (I see them often). But, before I do, I will probably do some research on drying fruits and veggies in the oven. So, if you have any experience with either using a food dehydrator, or with drying your produce in the oven, please share your knowledge in the comments below or join in the discussion on the You Can Make That Facebook Page. I would love see what you have to say.

This post has been linked to Try New Adventures Thursday.

Wednesday, March 7, 2012

Cole Slaw


Last week, at my Investment Cooking Class, I served this Cole Slaw with our lunch. Then, one of the ladies that attended the class invited me to join her for lunch this week. She requested that I bring along the Cole Slaw that we tasted at Investment Cooking. So, after making it twice within the last week, I thought maybe my You Can Make That readers would enjoy the recipe too.

It is so simple that it has become my go to salad when I am tired or in a rush. I mix it up before I start preparing the rest of my dinner and it is ready by the time we sit down to eat. And, if you purchase the bagged cabbage mix, there is no need to shred or grate the veggies. My favorite way to eat this is on Jerk Chicken Tacos.

Cole Slaw

7-8 cups shredded cabbage (or 16oz. pkg. bagged cole slaw mix)
1 carrot, grated (optional)
½ cup mayonnaise
2 Tbsp. raw sugar
2 Tbsp. white vinegar (or white wine vinegar)
¼ cup milk

In a large bowl, add all ingredients and stir to combine. Refrigerate for 30-60 minutes. Stir and serve.

Tuesday, March 6, 2012

Cinnamon Tortilla Chips


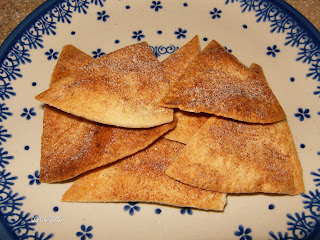
On Saturday, I went to the grocery store to pick up some lettuce for our dinner. But, as you know, it is almost impossible to go into the grocery store and walk out with only one item. I made it out with three. We were planning to have taco salad for dinner, but when I saw freshly made tortillas, I had to buy some. They were still warm in the package and very tasty!

But, what do you do with just a couple of leftover tortillas? They can be frozen, but since I am on a mission to clean out my freezer, I decided to make Cinnamon Tortilla Chips instead. We ate them yesterday sitting on the front porch after school.  

Cinnamon Tortilla Chips

4 flour tortillas
Olive oil spray
Cinnamon/sugar

Cut tortillas into triangles. I like to stack them and then cut them into six pieces with a pizza cutter.  Arrange on a cookie sheet, being sure not to overlap. Spray with olive oil spray (I use a refillable kitchen spritzer). Then sprinkle with cinnamon/sugar mixture. Bake at 425˚ for 10-12 or until browned and crispy. These can burn quickly, so watch them carefully. Remove from cookie sheet, and serve immediately.  Store the leftover chips in an airtight container for up to 3 days.

Frugal Tip: Don't let leftover flour tortillas go to waste. Try these Cinnamon Tortilla Chips for a simple after school snack.

This post has been linked to Frugal Tuesday Tip.

Monday, March 5, 2012

Fascinating Finds - Oatmeal Cookie Mix


Recently, I told you about a set of recipes for homemade cookie mixes that I learned about on a blog called Fake-It-Frugal. I had great success with the Sugar Cookie version, so I decided to try out the Oatmeal Cookie version. I mixed it up according to the recipe, but the dough was too dry. The recipe said to refrigerate the dough for 30 minutes before scooping out onto a cookie sheet; but, even after refrigeration, the dough was still too crumbly to scoop.  Knowing that I truly needed to bring these cookies to my kids Sunday night Bible program at church, I had to come up with a solution. So, I added an extra egg and the dough was exactly like cookie dough should be.

The cookies turned out great! The kids enjoyed them, they were simple to make, and I had all of the ingredients on hand. This recipe is a keeper. And, having a couple of mixes made up in advance is a nice solution to purchased pre-packaged mixes. (Yield: 18 cookies)

Heather, at Fake-It-Frugal, has all kinds of frugal recipe ideas and household solutions that will save you time and money. So, be sure to check out her blog below:

Website Link: Fake-It-Frugal

Friday, March 2, 2012

Reading Report

By now, you have realized that I primarily read nonfiction. But this week, I indulged in a novel, strictly for pleasure. I picked this one up because it was recommended to me as a lover of Fannie Flagg  (author of Fried Green Tomatoes). And, I was not disappointed. Susan Gregg Gilmore definitely writes in a similar manner and made me want to jump into the pages to participate in a simpler time and way of life.

Looking for Salvation at the Dairy Queen written By Susan Gregg Gilmore

Catherine Grace Cline is a girl who has lost her mother. She is raised by her father, who is a small town minister, along with her younger sister, Martha Ann.  Her hope and dream is to one day escape from her small town and make her way to the big city. But what she discovers along the way is that those she loves most, are not what they seem. This changes her heart and offers her the salvation that she has longed for all of her life.

This story has it all: love and laughter, tragedy and sorrow, pain and forgiveness. It captures rural, small town life at its best and its worst, with a little bit of the unexpected in between. So, if you are looking for a good read that will put a smile on your face and make you wish that it wouldn’t end, this is the book for you.

To learn more about this weekly reading report, click here.

Thursday, March 1, 2012

Jerk Seasoning


We eat Jerk Chicken on a regular basis. Everyone likes it, and it is easy to prepare. However, I have always purchased the seasoning. So, I decided that I would try making it myself for You Can Make That! This recipe took less than five minutes to mix up and I already had all of the herbs and spices in my pantry. I am glad to say that it was a great success! 

If you have not tried Jerk Seasoning before, it is mildly spicy and has a “sweetness” that comes from the allspice and cinnamon. It you prefer something a little spicier, you could double the seasoning. However, for my kids one tablespoon of seasoning per one pound of meat is the perfect ratio. And, Jerk Seasoning pairs perfectly with both chicken and pork, grilled or pan seared.

To prepare my Jerk Chicken, I typically cut boneless, skinless chicken breasts into bite sized pieces. Then, toss the chicken with the seasoning and olive oil, and brown in a skillet. Sometimes we eat it on its own, but we also like to serve it on a main dish salad with ranch dressing. However, my favorite way to eat it is on a tortilla with coleslaw.


Jerk Seasoning

2 tablespoons dried minced onion
2 1/2 teaspoons dried thyme
2 teaspoons ground allspice
2 teaspoons ground black pepper
1/2 teaspoon ground cinnamon
1/2 teaspoon cayenne pepper
1/2 teaspoon salt

Stir together all ingredients. Store seasoning in an airtight container in a cool, dry place. Yield: ¼ cup, enough for 4 pounds of meat

To Use: Stir together 1 Tbs. seasoning with 1 Tbsp. olive oil. Rub or spread mixture onto 1 pound of chicken or pork. Grill or pan sear meat until thoroughly cooked.

Note: Next time I mix up this seasoning, I may add ½ tsp. of nutmeg.

This post has been linked to Try New Adventures Thursday!
Related Posts Plugin for WordPress, Blogger...