Monday, December 31, 2012

New Year's Peppermint Bark

Photo Credit: Nestle Toll House

Each year on New Year’s Eve, we gather up all of the leftover candy canes that we collected over the Christmas season to make Peppermint Bark. None of us really care to indulge on plain old candy canes, so this is a good way to ensure that they do not go to waste. This year I didn't even buy candy canes for our tree and I still had enough from the gifts that we received and the treat bags from school to make a batch of our traditional New Year’s treat. My oldest is especially pleased with Peppermint Bark so she never lets me forget to make it!

Peppermint Bark

12 oz. pkg. white chocolate chips
½ cup crushed leftover candy canes or peppermint candies, divided

Line a baking sheet with parchment paper or wax paper. Set aside. Add white chocolate chips to a microwave safe bowl. Microwave on high for 30 seconds and stir. Repeat until chips are melted and the consistency is smooth. Stir in all but 2 Tbsp. crushed candy. Spread onto prepared pan. Sprinkle with remaining candies. Refrigerate until hard. Break into shards and serve.

This recipe has been adapted from the one found here.

Monday, December 24, 2012

Merry Christmas!


Hark the herald angels sing
"Glory to the new born King!
Peace on earth and mercy mild
God and sinners reconciled"
Joyful, all ye nations rise
Join the triumph of the skies
With the angelic host proclaim:
"Christ is born in Bethlehem"
Hark! The herald angels sing
"Glory to the newborn King!"

Written by: Charles Wesley

Thursday, December 20, 2012

Christmas Dinner Menu

We will be celebrating Christmas at home this year. My parents will be with us and we are all looking forward to our time together. I hate to have to spend my day in the kitchen though, so I like to have most of my food made ahead of time. Getting the bulk of the cooking done in advance allows me to enjoy the day with family opening gifts and having fun together. This year we will be eating spiral sliced ham and the following sides:


And, let's not forget dessert!


What will you be serving this year? 

Tuesday, December 18, 2012

Sweet & Salty Popcorn

Photo Credit - Popcornopolis

Growing up, my mom made lots of stove top popcorn. She served it with real butter and salt. However, I have never been much of a regular popcorn lover. But, when I tried Sweet & Salty Popcorn (or kettle corn) for the first time, I fell in love with it. There is something about that touch of sweetness that transforms regular popcorn into an entirely different snack for me.

Lately, I have been making this Sweet & Salty Popcorn quite a bit. Three times in the last week to be exact! Although this is perfectly good plain, we have found that we also really like to flavor it with cinnamon, pumpkin pie spice, or cocoa powder.  All flavors are gobbled up at my house, but my favorite is the pumpkin pie spice.  If you can’t get everyone to agree on a single flavor, each person can season their own portion to taste.

Sweet & Salty Popcorn

¼ cup butter
1 Tbsp. olive oil
¼ cup white sugar
½ cup popcorn kernels
1 tsp. salt
Cinnamon, pumpkin pie spice, or cocoa powder (optional)

In a large pot, melt butter and olive oil together over medium high heat. Add sugar and heat until it just begins to brown, stirring constantly. Add popcorn and stir. Cover and continue to cook until all of the popcorn has popped, occasionally shaking the pan to keep it from scorching. Remove from the heat, transfer to a large bowl, and toss with salt and additional seasonings, if desired. Yeild: 8 cups popcorn.

Thursday, December 13, 2012

Homemade Peppermint Mocha Creamer


I hung out with some friends last weekend and they offered me some Peppermint Mocha Creamer for my coffee. I loved it! When I got home, I got to thinking about it and wondered if I could make it homemade.  The recipe below is what I came up with.

Because I usually just use half and half in my coffee, this seems so decadent to me. And what a great treat for Christmas. I served a cup of coffee to my neighbor yesterday and she really liked it too. Now I’m thinking that I would like to try to make other flavors!

Peppermint Mocha Creamer

1 ¾ cup milk
1 Tbsp. unsweetened cocoa powder
14 oz. can sweetened condensed milk
½ tsp. peppermint extract

Measure milk into a quart sized Mason jar. Microwave the milk on high for 90 seconds. Add cocoa powder, cover jar and shake to dissolve. Add the sweetened condensed milk and peppermint extract. Cover and shake to combine. Store in the refrigerator and shake before serving with coffee.

Tuesday, December 11, 2012

Easiest Mac and Cheese


Macaroni and Cheese is a staple at our house. But, my kids have never been too excited about the kind that comes in the little blue box. Instead, I have always made stove top macaroni and cheese by melting butter, adding flour, and finally stirring in milk and cheese. Nothing fancy. But this recipe is so much simpler, and my kids have asked that I switch to this recipe permanently. And, with only three ingredients (macaroni, cheddar cheese, and sour cream), you will hear no complaints from me!

I've made this recipe several times now and I have used cubed cheese as called for in the recipe and grated cheese. Both work great. I have also skipped the baking part and just stirred it up on top of the stove and it has also turned out beautifully. I have even used different shaped pasta, and all of it has been good. I would imagine that if you liked a cracker or bread crumb crust on top that you could add that too.

I found this recipe on Jessica's blog called Life As Mom. So, be sure to check out Life As Mom for all kinds of fun info on recipes, budgeting, child care, and family life.

Blog Link: Life As Mom

Friday, December 7, 2012

Maple Granola

We always have a batch of granola in the pantry. It is our standby breakfast when I just can’t get motivated to get up in time to prepare anything else. It is my oldest daughter’s favorite late night snack. And, it is my youngest daughter’s best loved topping for yogurt. In the past, I have told you about two other recipes for granola that we enjoy:


A couple of weeks ago I made Maple Granola for the first time. It is nowhere near as sweet as the Homemade Granola and the maple flavor is very mild. This is a loose granola without clusters.  It is also a much simpler recipe to prepare having only two ingredients and only needing to stir them together before baking. The one drawback to this recipe though is that maple syrup can be pricey.  However, a batch of this Maple Granola is still considerably cheaper than purchasing it pre-made at the grocery store.

Maple Granola

10 cups old fashioned oats
1 ¼ cup real maple syrup

In a large baking pan, add oats. Drizzle with some of the syrup and stir. Repeat until all of the oats have been evenly coated. Bake at 350˚ for 30 minutes, stirring every 5 minutes. Cool completely and store in an airtight container.

Recipe Tip: I like to use my roasting pan to make granola. The high sides keep it from spilling out when  I stir it while baking.

Tuesday, December 4, 2012

Christmas Blessings

The Christmas season has begun. Over the weekend, I attended my first holiday party and I spent hours decorating my home. This week I plan to trim my tree and I am hosting a holiday party of my own. I even received my first Christmas card in the mail yesterday. Although this Christmas will be very different at my house, I know that I am still blessed.

I am blessed by new friends to share Christmas treats with.


I am blessed by dependable neighbors to keep me company and to swap holiday food gift ideas with.


I am blessed by old friends who have continued to love on me and my family when times have been tough. I am especially thankful today for my friend Laurel, who lives in Germany. She sent my kids Chocolate Advent Calendars like the one pictured below to celebrate the season.

Christmas Advent Calendar

What have you been blessed with this Christmas season?

Thursday, November 29, 2012

Strawberry Oatmeal


My kids love fruit flavored instant oatmeal packets. And, while traveling over Thanksgiving, we ate the instant oatmeal available at our hotel for breakfast. But, I never buy it. Normally I make the Overnight Oatmeal or Chocolate Oatmeal recipes that I have shared with you in the past. However, about a month ago, my son asked if I could come up with a homemade version of Strawberry Oatmeal. The problem though, was that he wanted the flavor of the instant oatmeal, not the flavor of real strawberries. So, I experimented a bit and came up with the recipe below.

My son is very pleased. However, he prefers that I make it up fresh instead of soaking the oats overnight. My kids have always eaten oatmeal without much of a fuss, but now they are asking me to make this all the time. I’m thinking that it might be a good idea to test out some other flavored extracts!
  
Strawberry Oatmeal

2 cups old fashioned oats
¼ cups sugar (white or raw)
1 tsp. strawberry extract
1 cup milk
1 cup water

Stir together all ingredients in a microwave safe bowl. Cover and refrigerate overnight, if desired. To serve, microwave, uncovered, on high for 4-6 minutes, or until heated through. Yield: 4 servings.

Recipe note: I have found that the strength of the extract can vary according to brand, so you may need to add more or less extract depending on the strength of your brand.

Tuesday, November 27, 2012

Leftover Turkey Strata


I have a love/hate relationship with leftovers. On one hand, it is nice to have a night off from cooking. On the other hand, I don’t care for eating the same meal two nights in a row. I do love investment cooking though. And, this is one of those recipes that recreates leftovers into something completely different. So, if you are tired of trying to eat up that leftover Thanksgiving turkey, you may enjoy this for a change.

When I made this the other day, I used some stale Asiago cheese artisan bread instead of the French bread. I have to say, that it tasted fantastic!

Turkey Strata

3 cups leftover French bread, cubed
3/4 cup chopped leftover turkey or chicken
1 small can diced green chilies
3/4 cup shredded cheddar cheese
2 eggs
1 cup milk
2 Tbsp. mustard

Layer half of the bread, turkey, chilies, and cheese in a small casserole dish or pie pan. Repeat layers. Whisk together eggs, milk, and mustard. Pour over layered casserole. Bake at 325˚ for 45 minutes, or until browned. Serves 4.

This recipe can be made up early in the day or the night before and refrigerated until ready to bake. Or, it can be doubled easily and baked in a 9X13 pan to serve more people.

This post has been linked to Frugal Tuesday Tip.

Tuesday, November 20, 2012

Warm Winter Drinks

With the cooler weather, I have been craving warm drinks like coffee, tea, and hot cocoa. So, this weekend I made my kids super happy by making up a batch of Decadent Hot Cocoa Mix, which we drank with Chocolate Chip Muffins for breakfast on Saturday morning.


But, my son’s favorite warm drink is Hot Cinnamon Milk, so I made up a batch of that mix too and we enjoyed it with Sweet Potato Muffins on Sunday morning.


Both of these warm drink mixes take only minutes to make and are perfect for frugal Holiday gift giving.

This post has been linked to Frugal Tuesday Tip.

Thursday, November 15, 2012

English Muffin Bread

Photo Credit - Money Saving Mom

It has been close to six months since I have made homemade sandwich bread, and my son especially misses it. Typically I make Multigrain Sandwich Bread, but yesterday I decided to try something new. I saw this recipe for a no knead English Muffin Bread on Crystal’s blog called Money Saving Mom back in June. And, I am happy to say that it was super simple and delicious! 

I am not exactly sure why this bread is called English Muffin Bread. It neither had the texture of English muffins, nor the taste of them. But, I am definitely not holding that against it because we all loved it. Although the recipe called for all purpose flour, I substituted two cups of white whole wheat flour for part of it because I did not have enough all purpose flour on hand. I also baked it in three, one pound loaf pans instead of in two larger loaf pans so that I could give a loaf to my neighbor. But, it turned out beautifully even with these changes.

Crystal, at Money Saving Mom, has lots of money saving tips, frugal recipes, and coupon advice. So be sure to check out her blog below:

Blog Link: Money Saving Mom
Recipe Link: English Muffin Bread

Tuesday, November 13, 2012

Cocoa Cinnamon Spread


This is a decadent indulgence that perks up boring old breakfast toast. My little one even went through a phase a couple of years ago when she just HAD to have this spread for lunch every day. Last week we ate this on some leftover Quick Yeast Rolls and when the rolls were gone, we spread the last of it on crackers.

This would make a nice gift in a jar. Either the dry ingredients could be packed in a jar with instructions to mix up the spread, or the completed recipe could be packed into a jar and given along with some fresh bread. Once prepared, this will keep on your counter for about 5 days, but if you think that it will hang around longer than that at your house, you can store it in the refrigerator for up to two weeks.

Cocoa Cinnamon Spread

1 cup powdered sugar
1 ½ tsp. cocoa powder
1 ½ tsp. cinnamon
1 stick butter, softened

Measure all ingredients into a bowl and thoroughly blend, using a fork until smooth. Spread on toast, bagels, or pancakes.

Thursday, November 8, 2012

Milk Shakes


Last summer I told you about my love for the blender and the Chocolate Milk Shakes that my son adores. Even though the weather has turned cool here in North Carolina, we have continued to make lots of Milk Shakes this Fall. The new favorite with all three of my kids is strawberry, but we have enjoyed vanilla and peanut butter shakes too.

While at the grocery store last week, I looked at all of the different extracts on the baking aisle and thought I might try raspberry next.

Basic Milk Shakes

2 cups whole milk
½ cup powdered sugar
2 cups ice
Plus ingredients for one of the flavor variations below

Flavor Variations:
For Chocolate: Add 1/4 cup unsweetened cocoa powder and 1 tsp. vanilla extract
For Vanilla: Add 2 tsp vanilla extract
For Strawberry: Add 1 Tbsp. strawberry extract
For Peanut Butter: Add 1/4 cup creamy peanut butter

Add all ingredients to a blender and blend until the ice is broken and everything is thoroughly mixed. Yield: 4-5 servings

Recipe Note: Definitely use whole milk for this recipe. It needs the fat for the best flavor.

Tuesday, November 6, 2012

Fascinating Find - Brownie Mix


Earlier this year I told you about some homemade cookie mix recipes that I had found on Heather’s blog, Fake-It-Frugal.  My family has enjoyed both the Sugar Cookie recipe and the Oatmeal Cookie recipe many times since then. Last night, we tested Heather’s Fake Betty Crocker Brownie Mix recipe. They were simple and delicious, and I will definitely be making these again and again. If you have never make homemade brownies, be warned, you will never go back to a mix!

I used melted butter instead of the vegetable oil called for in the recipe and I baked them in an 8X8 pan. I tested these because I thought that the dry ingredients, packed in a pretty jar, would make a simple and inexpensive Christmas gift for the kid’s teachers.

Heather, at Fake-It-Frugal, has all kinds of frugal recipe ideas and household solutions that will save you time and money. So, be sure to check out her blog below:

Website Link: Fake-It-Frugal
Brownie Recipe Link: Fake Betty Crocker Brownie Mix

Friday, November 2, 2012

Alfredo Sauce


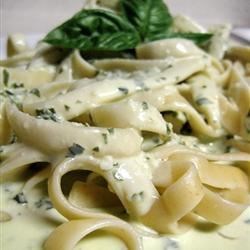
My cooking has changed a bit now that it is just me and the kids, especially my dinner menus. We eat a lot less meat and the kids don’t seem to notice. I discovered this recipe over the summer and we like it because it is incredibly thick.  And, thanks to this recipe, my kids have learned how to “twirl” their pasta onto their forks to eat it. We always giggle a lot about it and they certainly make a mess with it, but it makes dinner so much more fun!

This recipe makes enough sauce for a full box of pasta. I typically toss angel hair pasta directly in the sauce before serving. It would also be perfect on grilled meats, in lasagna, or with steamed veggies. It reheats nicely too, so don’t be afraid of leftovers.

Alfredo Sauce

½ cup butter
2 cloves minced garlic
8oz. cream cheese
2 cups milk
6oz. freshly grated Parmesan cheese
2 tsp. Italian Seasoning
Salt and Pepper to taste

Melt butter in a sauce pan along with the garlic. Cut in cream cheese and whisk until melted. Whisk in milk a little at a time until smooth. Add cheese, Italian seasoning, salt, and pepper. Whisk until cheese is completely melted. Serve over pasta, meat, and/or veggies.

This sauce thickens as it cools, but you can thin it with additional milk if need.

This recipe has been adapted from the one found here.

Tuesday, October 30, 2012

Our Favorite Fall Foods

We have been enjoying lots of Fall foods lately. My oldest especially loves apple slices dipped in caramel. I have made several batches of Caramel in a Can this Fall that we have gobbled up with Granny Smith Apples. This simple recipe can be made in the slow cooker and is no trouble at all.


My son's favorite Fall food is Sweet Potato Muffins. He is not much of a fruit or vegetable lover, so I sneak them in wherever I can. These muffins make him so happy that he dances around the kitchen in pleasure when I make them!


This Pumpkin Snack Cake is one of my favorites because it is so moist. We normally eat this for breakfast with powdered sugar sprinkled on top. I served it last weekend to a group of friends and there wasn't a single crumb left when everyone went home.


What are your favorite Fall foods? 


Saturday, October 27, 2012

Candy Corn Crunch


Last weekend I went to a party at my neighbor's house. It was a girls night out and we had a blast! It was the first time I'd had a babysitter since I moved to North Carolina and I have to say it was an absolutely fabulous treat to come home to a quiet house where someone else had put the kids to bed. My neighbor went all out with Fall treats and Halloween decorations. And, as part of her decorations, she had candy corn displayed in pretty cocktail glasses on the food table.

As the party was coming to a close, we were discussing what to do with all of the leftover candy corn. One of the girls said that she liked to mix candy corn half and half with peanuts for a snack. Perfect! So, my neighbor gave me the candy corn, and I made up an unbelievably huge batch of Candy Corn Crunch to share. I sent some with my son on a camping trip this weekend, gave some to my neighbor, and the girls and I have been munching on the rest of it.

I would imagine that if you are allergic to nuts, that mini pretzels would be just as good as the peanuts.  And, raisins or dark chocolate chips might be good additions too.

Candy Corn Crunch

2 cups candy corn
2 cups peanuts, cocktail or dry roasted

Mix together and serve.

Thursday, August 30, 2012

DIY Taco Seasoning Mix


Last winter I told you about Mary Ostyn's cookbook called Family Feasts for $75 a Week.  My copy is stained and torn, and we have loved every recipe that we have tried.  (If you likeyou can read my full review here.)

Recently, on Mary's blog called Owlhaven, I noticed that she posted her recipe for DIY Taco Seasoning Mix that is found in her cookbook. This recipe is an excellent substitute for the little packets that you can buy in the grocery store, and it is so much tastier. I have been using this recipe exclusively ever since I purchased her cookbook several years ago and I am thrilled that she posted it so that I could share the link with you!


Mary has lots of great recipes, money saving household tips, and parenting advice to share, so be sure to click over to Owlhaven to check it out!

Recipe Note: I typically omit the cornstarch called for in this recipe with great results.

Wednesday, August 22, 2012

Investment Cooking

Today, my friend Terri is arriving from Texas for a visit. I am really pleased to have her here to help me with the back to school shopping. Plus, her visit has given me the motivation to get serious in my kitchen again. I have done some investment cooking over the last few days and it feels good to have my pantry and freezer stocked with healthy, homemade convenience foods.

I have made...


I have also cooked up two pounds of dry pinto beans and a large batch of chicken for Teriyaki Chicken and Chicken Caesar Salad. I even made Chicken Broth with the leftover chicken bones. I have to say, cooking is good therapy!


Monday, August 13, 2012

Our Hearts Are Broken

My flesh and my heart may fail,
but God is the strength of my heart and my portion forever.
Psalm 73:26

It has been over a month since I have been here, and I have missed it. However, we have faced unbelievable tregedy and we are just now starting to make sense of our loss. Only two weeks after we moved into our new home, my husband stepped out of our front door to go for a run and was struck by a car. He died the next day due to severe head injuries. Although our grief is heavy, we know for certain that he was welcomed into eternity by our Lord and Savior, Jesus Christ. And, we take great comfort in the fact that we will one day join him in heaven.

I will continue blogging here, but I am not ready to jump into it again right now. However, you will be glad to know that I have made my way back into my kitchen; and, I have found great comfort in my routine cooking and baking tasks.  So, until I am able to return to You Can Make That, please be sure to keep us in your prayers.

Friday, July 6, 2012

The Summer Kitchen

I read this book the week before we moved. It was a good, light read that was perfect for taking my mind off of the move before I went to sleep at night. I did not realize, until I sat down to write this review, that the author is from the Texas Hill Country not far from where we lived. Lisa Wingate has written many other books and I will probably check them out more thoroughly once we have settled into our new house.

The Summer Kitchen  written by Lisa Wingate

Sandra’s world is crashing down all around her. She is lonely and confused. So, she begins spending her days at her Uncle Poppy’s house. Although she begins by doing some cleaning and painting to prepare to sell the house, she finds herself with a secret mission to care for those in need.

This is a story about love and hurt, restoration and new beginnings. It addresses family issues such as adoption, marriage struggles, death, hunger, and poverty. But most importantly, it illustrates that even a few humble peanut butter and jelly sandwiches can made a big difference in the lives of those in need. I would recommend this book to someone that enjoys a quick read with a strong moral emphasis. And, it is obvious from the title that is an appropriate read for the summer.

Thursday, July 5, 2012

My Budding Chef!


The other day, while eating lunch, my little one decided that she wanted a second sandwich. Well, the rule at our house is that you have to wait for seconds until everyone has finished their first helping.  So, not wanting to wait, she went to the counter and made her own peanut butter and jelly sandwich! This is the first time she had ever attempted making any food on her own and she did a great job. She was so proud of herself that she started jumping and dancing around the kitchen and singing about making her own lunch. Since then, she has made a number of sandwiches on her own and she has even moved on to putting jelly on her own biscuits in the morning. My little one is growing up!

This post has been linked to Try New Adventures Thursday.

Tuesday, July 3, 2012

Zucchini Salad


I am super excited to have a local farmer that sets up a daily stand around the corner from my house. The farm stand is so close that we are able to walk to it! We have enjoyed fresh, local tomatoes, corn, cucumbers, and zucchini.  And, the low prices have encouraged me to try new recipes and be more adventurous.

We first tried this salad at a friend’s house about a year ago. When I asked for the recipe, my friend told me to slice the veggies and toss them with vinaigrette. Below is the recipe that I have used ever since. The Zucchini Salad pictured above was made with small squash, so I just sliced them thinly. However, if you use larger squash, you may want to cut your squash in half lengthwise before slicing them. (This will make the salad easier to eat.)

Zucchini Salad

2 small or 1 large zucchini
2 small or 1 large yellow squash
Small bunch of green onions
Salt to taste

Dressing:
3 Tbsp. olive oil
1 ½ tsp. red wine vinegar
1 ½ tsp. sugar (raw or white)
Slice zucchini and yellow squash thinly into a bowl. Slice green onions and add to bowl. In a separate bowl, combine the ingredients for the dressing and whisk together. Pour over the veggies. Toss to combine and salt to taste. Refrigerate for 1-2 hours before serving.

Frugal Tip: Farmer’s Markets often have incredibly low prices on in-season produce. Be sure to take advantage of the savings and learn how to prepare these fruits and vegetables. And, if you have time, preserve some by canning or freezing for the future.

This post has been linked to Frugal Tuesday Tip.

Monday, July 2, 2012

My New Kitchen


For the first time in almost a month, I am sitting down to write a live post. And, it feels good. All of what you have seen here on You Can Make That for the last three weeks was written long before our move. But, today is the day that I have decided to return to routine. Not only am I publishing a live post, I have also planned a menu for the week, created a grocery list, and plan to shop this morning.

As with any move, we have encountered many hiccups over the last few weeks, but we have also been showered with many blessings. One of those blessings is our new kitchen. This picture was taken before our household goods were delivered and unpacked.  I am certainly enjoying cooking and baking in my new kitchen and I already have lots of new recipes to share with you that have been created here.

In the picture above, you will notice some decals on the tile backsplash. They are gold leaves and were definitely not to my liking. I used a razor blade to remove them immediately! My backsplash now looks sparkling clean and simple.

Many of you have sent me thoughtful messages and have offered heartfelt prayers on our behalf during our transition. Thank you all for your love and concern. We have truely been blessed by your expressions of friendship.

This post has been linked to Mop It Up Mondays.

Friday, June 29, 2012

The Kitchen Counter Cooking School

I purchased this book after reading a review from another blogger; and, it was well worth the investment!

The Kitchen Counter Cooking School written by Kathleen Flinn

After finishing her culinary degree at Le Cordon Bleu in Paris, Kathleen found herself wondering what to do next.  However, after a chance encounter at the local grocery store where she helped a mom figure out how to replace her pre-packaged grocery supplies with fresh ingredients, she embarked on a project that would bring confidence to nine hesitant home cooks. Kathleen began by putting together a group of volunteers that would allow her to come into their homes to investigate how they cook, and then teach them how to be proficient in the kitchen. She taught these women, from diverse economic backgrounds, how to perform elemental tasks such as chopping vegetables, roasting chicken, making stock, and creating soups. The results for each volunteer were different, but they all gained confidence and know how that changed the way they ate.

As someone who teaches simple cooking classes on a regular basis, I thoroughly enjoyed this book. I have seen the same sense of accomplishment on the faces of women that Kathleen describes in her book. The overall feeling of community that takes place in the kitchen is something that is essential to the health of our bodies and our families; and, this book definitely portrays that feeling. I would recommend this book to both seasoned home cooks and new cooks alike. It offers a wide range of hints and tips along with some tasty looking recipes. A great read for anyone who needs inspiration in the kitchen!

To learn more about this weekly reading report, click on the tab above.

Wednesday, June 27, 2012

Fascinating Find - No Bake Chocolate PB Bars


I saw this recipe a couple of months ago on Talking Dollars and Cents. When I was making these delicious treats, I was thinking that they were going to be like granola bars. Boy was I wrong! These are definitely dessert. They were simple to make, and everyone loved them. Plus, the kids were especially pleased to be served a dessert instead of a granola bar.

Be sure to check out Kathryn and Alexandra’s blog where you will find lots of great recipes, menu planning ideas, and coupon tips and hints. Thank you Alexandra for sharing such a decadent dessert recipe!

Tuesday, June 26, 2012

Homemade Croutons


Food waste ruffles my feathers a little bit. And it is because we have lived through some very lean times in our marriage over the years. So, when I see recipes that literally create something from nothing, it does my heart good to know that others take food waste as seriously as I do. Cindy over at The Christmas Plan wrote a post recently titled When Life Hands You Lemons. Cindy talks about a ruined batch of sour dough bread and how she turned the inedible bread into tasty croutons.

Well, with the stale pieces of my recent loaf of No-Knead Beer Bread, I tested out Cindy’s recipe for croutons. Not bad for a first try. We ate more of them off the pan than in the salad. I think that I may have baked them too long because they were hard to spear with my fork, but still yummy. I will definitely be trying out this technique again to perfect it.

Be sure to check out Cindy’s blog to read more about her desire to live a simpler life while instilling within her children the meaning of true wealth. You will find recipes, craft projects, and fun stories about learning to raise ducks! Thank you, Cindy for sharing a great recipe that reduces food waste and illustrates “the joy of doing more with less.”

Blog Link: The Christmas Plan
Recipe Link: When Life Hands You Lemons (Crouton Recipe)

This post has been linked to Frugal Tuesday Tip.

Monday, June 25, 2012

Recipes To Try...

I have not been doing much cooking or baking lately. We have spent so much time coordinating our move by packing, unpacking, cleaning, and organizing that we have been eating the simplest foods possible. However, I have seen a few recipes that I am looking forward to trying once our life gets back to normal and settles into a routine again.


Have you tried anything new lately?

Friday, June 22, 2012

Food Rules

Do you find food complicated? Do you walk the aisles of the grocery store reading labels and shaking your head? Do you wish that you knew what to do with all of that great looking produce at the farmer’s market? Well, you are not alone. And, Michael Pollan, has written a short and sweet book on how to figure all of this out.

Food Rules: An Eater's Manual written by Michael Pollan

This is a book of food wisdom complied to help people navigate the grocery store and eat better. The rules are simple and straight forward. And, you do not have to have a degree to understand them. For example:

Rule #2 Don’t eat anything your great grandmother wouldn’t recognize as food
Rule #45 The whiter the bread, the sooner you’ll be dead
Rule #74 Don’t get your fuel from the same place your car does

If you need a quick jump start to eating more responsibly, this would be a great place to begin. Eating real food is intimidating, but this book takes out some of the guess work and offers some fun advice to get you on track. And, now that summer is here, and farmer’s markets are opening again, it is a great time to make a commitment to healthy eating.

To learn more about this weekly reading report, click on the tab above.
Related Posts Plugin for WordPress, Blogger...